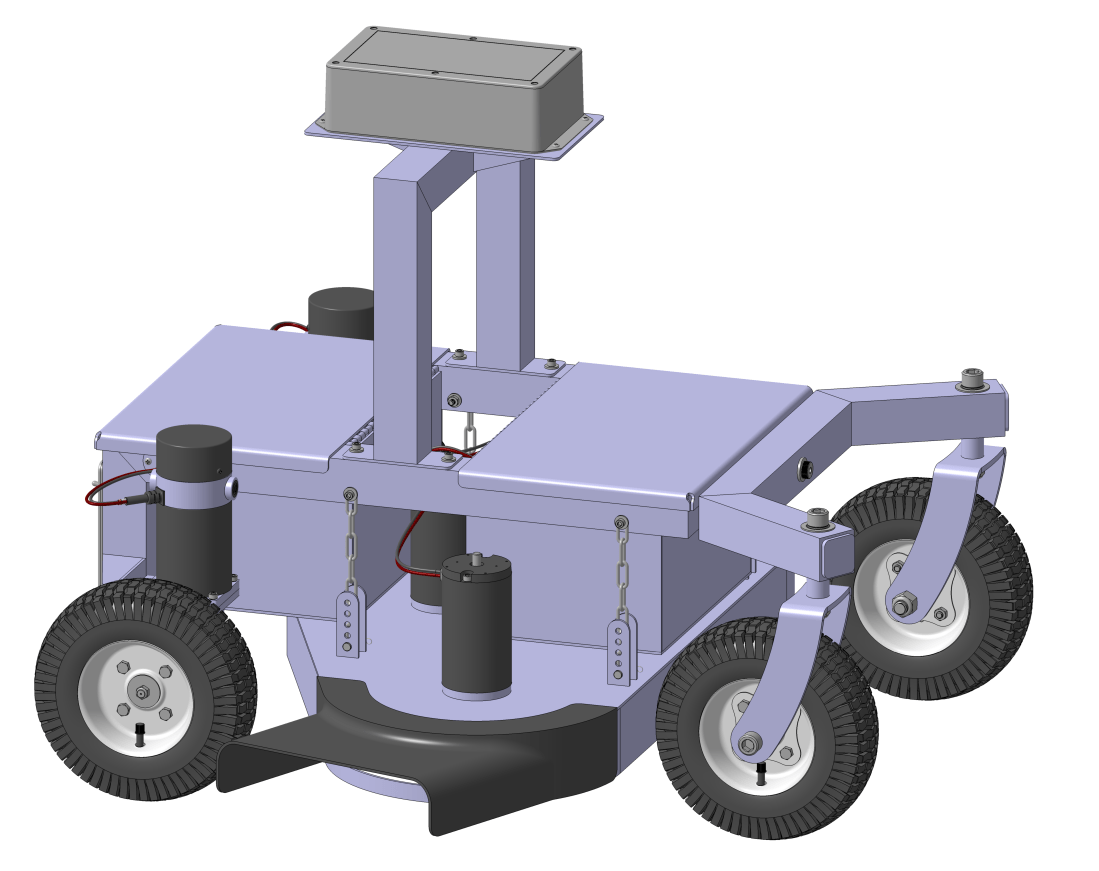
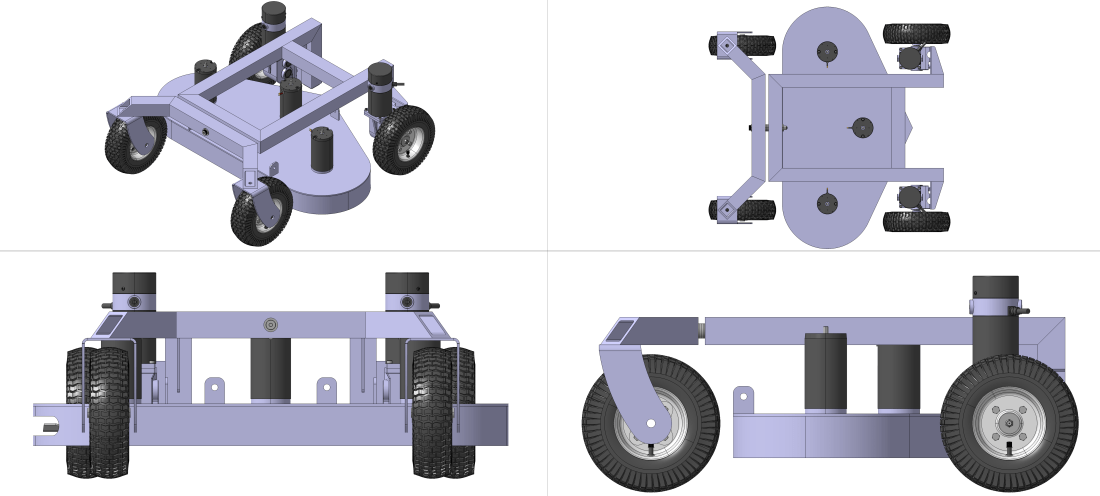
The robot mower design as of this weekend. Some wiring is completed.
I’ve decided to change a few things on the robot mower design. I have a tendency to get hung up on really small things by spending way too much time thinking about them. The deck height adjustment was turning into one of those things.
I’ve changed the design to include four simple clevis pins. They’re $0.50 a piece. You don’t need to adjust the deck height that often, and spending $100 on parts to do that in a fancy way is a waste of effort and money.
I modeled up a discharge chute because I think the mower will need one to look professional. I intended to 3D print it, but it turns out the dimensions are big enough that most hobby websites won’t take it. I know of a place nearby that does industrial 3D printing and they quoted me $290 for the part out of ABS. Yikes. Maybe I’ll try to adapt an off the shelf chute instead. That’ll be more reverse engineering but it will probably work better. And cost a few hundred less.
Some simple XT60 connectors for the motors. They’re rated for 60A and should be appropriate for this application.
I’ve started modeling up some wires and coming up with a way to neatly connect the motors was more challenging than I thought it would be. I found some “wall mount” XT60 connectors that will hopefully will work well. I’ll have some mounting plates NC machined and then attach the XT60 wall mounts to the plate.
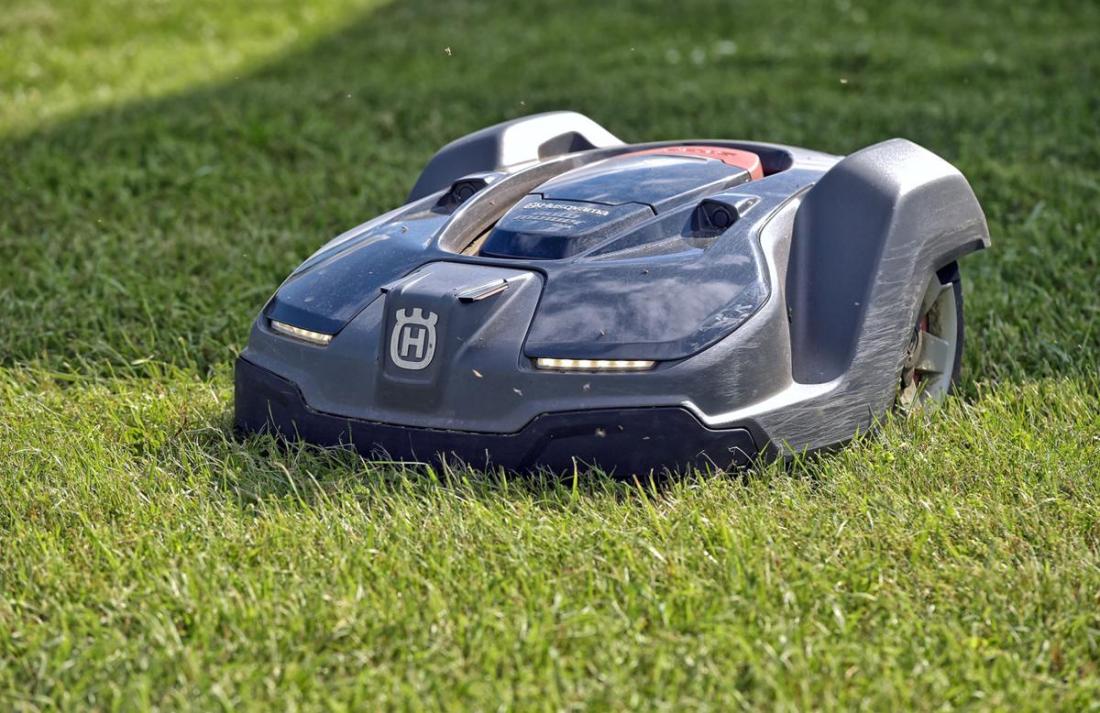
A typical robot lawn mower on the market today. It’s basically a Roomba, but for your lawn. Have fun tearing up your lawn to bury cable!
When you google “robot lawn mower” you will find a bunch of Roomba looking robots like the one above. The missing ingredient between these robots and the one I’m attempting to make is one thing: positioning.
When you need your lawn mowed, you want it to be mowed 100%. You don’t want half the lawn cut and the other half not cut. You don’t want gaps of uncut grass between your stripes. You don’t want random paths cut through your lawn. You want nice, parallel, alternating stripes.
To accomplish that, you need to know the location of the mower throughout the process so you can keep track of areas that have been cut, and so you can cut the grass in a specific manner. Back and forth stripes, for example, or perhaps a nice circular spiral moving outward from a tree.
I’ve come to the conclusion that to really automate the mowing process, you need at least +/-1in of positioning accuracy. Historically, such a system required a $40,000 survey grade GPS system from Trimble or Leica and the equivalent of a master’s degree in computer engineering to integrate it into your robot.
So the Roomba mower guys, given these constraints, came up with the following solution:
Who cares where the mower is? Just fence it in and have it mow all the time. You’ll eventually cut all the grass. We gotta make a product that we can realistically sell to people at a profit, you know.
-Some engineering manager out at Roomba Mowers Inc, I’m guessing
Every robot mower has to compete with the neighbor kid that will mow your lawn for $20. He’ll even try to make the stripes in the front lawn mostly straight and parallel. That’s the price point and level of quality that you have to beat with any robotic mowing system.
The Roomba mower guys sacrificed quality and scalability to get there with their system. Those are probably decent tradeoffs if we’re honest. While these Roomba mowers are for the most part a novelty, for some folks they work okay. But in the scenarios where they do perform well, they’re probably not value added at their $2,000+ price point.
So for years, guys like me that dreamed of real robot lawn mowers were left with just that: dreams. I don’t have $40,000 laying around, and I’m a mechanical engineer, not a hardware guy or a computer engineer. And even if I had both of those things, such a system can never turn a profit in the market place.
What would a composite lithium ion battery look like if we were to use one for the mower?
What the performance of a hypothetical lithium ion battery could look like if we were to use one.
We need a nominal voltage of 24V, so if you string 7 18650 batteries with a nominal voltage of 3.6V you’d end up with 25.2V, which should work fine.
String 15 sets of those 7 rows of batteries connected in series together and you get a battery with 45Ah of charge. Not too shabby. This would be a 7s15p battery in lithium ion parlance, I think.
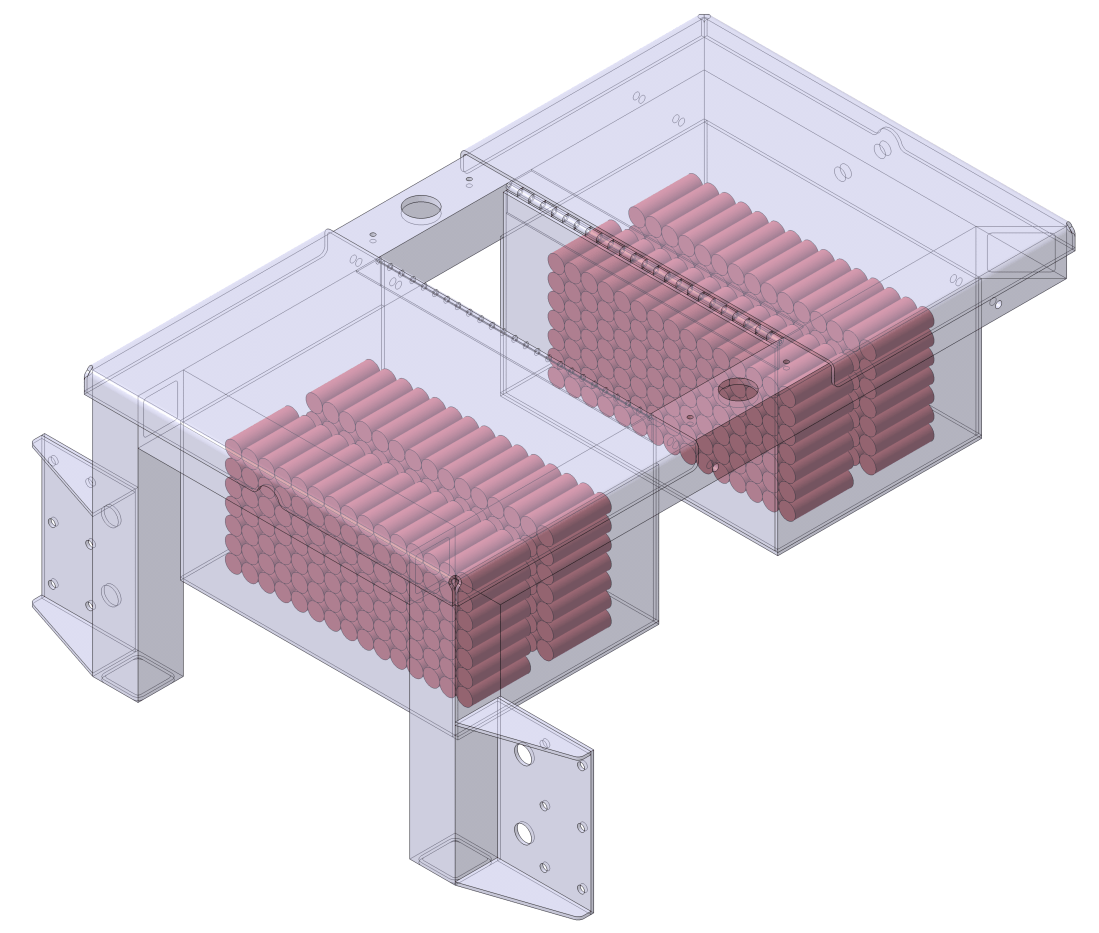
Two of those 7s15p batteries would fit in each of our two battery bays. You’d need a total of four to achieve the numbers shown above. They’d fit in our robot something like this:
How the lithium batteries would fit in the battery bays. Very compact. Very expensive.
The weight savings here are significant: 70lb. This is to be expected, but I’m surprised it’s this high. I don’t have a truck to haul this robot around in, so the lighter I can make it, the easier it will be to take it out for field testing. The reduced weight should also decrease the power consumption from the robot’s drive motors, making it more efficient, and possibly more agile.
The cost is still going to be over $1,000 though. Talking with some suppliers, I think the 18650 cells cost a little less than what Amazon will quote you, probably closer to $4.50 per cell. But you still need some fancy charging equipment, and there will be labor and material cost for building up the battery and coming up with a way to secure them in the battery bay.
I may start out using SLA batteries because the monetary risk is pretty low, about $300. They may perform better than I’m expecting. If they don’t, the lithium ion batteries appear to be a good plan B if we need more run time.
I think I may have incorrectly estimated my power needs for the mower. A key assumption I’ve been making is that the motor will generally need to be capable of generating ~5ft-lbf of torque during maximum operation. I’m not sure this is really true though.
Do We Really Need 5ft-lbf of Torque?
The 5ft-lbf of torque figure comes from taking a typical gasoline push mower engine and looking at the gross torque output of the engine. But one variable I forgot to consider is that the torque curves I looked at are associated with an engine typically used with an 18in to 21in blade. Our mower uses a 12in blade.
Intuitively, the torque we need to cut through grass is going to be positively correlated to the amount of grass we’re trying to cut at once. So a smaller cutting blade should require less torque than a larger blade. There’s less grass for the blade to run into, sapping momentum from the rotating blade.
I have no idea what the relationship between blade length to required torque looks like. I am going to assume it is linear for simplicity, but I have no clue if this is a good assumption. The torque you need is also going to be related to the quantity of grass clippings circulating around under the deck impacting the blade. Good luck modeling that.
Given the smaller blade size, let’s say you only need 60% of that 5ft-lbf torque value, so 3ft-lbf or 2.2N-m of torque. That’s the ratio between a 20in blade and a 12in blade.
How Much Current Does the Motor Draw at 3ft-lbf of Torque?
The performance curves for the E30-400 motor say that the motor consumes 56A of current at 3ft-lbf of torque. I think this is a more accurate number for current draw from the motor.
Performance curves for the AmpFlow E30-400 DC motor.
How Much Power Does the Motor Consume at 3ft-lbf of Torque?
Another mistake I made was pulling power numbers off this chart thinking they were power supplied to the motor, not shaft power output by the motor.
This is an important distinction, because no motor is 100% efficient. The input power should be the power supply voltage of 24V times the current consumed at a given point on the curves. At 3ft-lbf of torque, it’s (56A)(24V) = 1344W.
This jives with the chart above, because shaft output power at 3ft-lbf or 2.2N-m of torque is about 1040W. That would imply an efficiency of (1040W)/(1344W) = 77%. The chart says the motor is about 75% efficient at this torque, pretty close to this estimation.
So under maximum operating conditions, each motor should consume 56A of current and 1344W of power. The three motors collectively consume 168A of current and 4062W of power.
Is That a Good or a Bad Number?
The 168A number is acceptable because it is right at the limit of what the Mauch current sensor can handle. It’s rated for 200A of current and that leaves us 32A of current for drive motors and miscellaneous control electronics, which should be enough.
So assuming our three mower deck motors consume 56A, our two drive motors consume 12A and our control electronics consume 5A of current, you could have a maximum of 197A drawn from the batteries. Very little margin, but I think it should be okay because…
Maximum Versus Typical
One additional thing I’d like to mention is that I think these are maximum power consumption numbers. Previously I referred to them as typical power consumption numbers.
Do you need 3ft-lbf of torque while mowing the entire time? I doubt it. The calculations above prove that if our electric motors need to operate at 3ft-lbf of torque, they should be able to do it. Operating at 3ft-lbf of torque drops the rotation speed down to 4500RPM which results in a blade tip speed of 14100ft/s, which is a little lower than I’d like but should work.
Run Time Recalculated
Turns out I also miscalculated how battery charge adds when batteries are connected in parallel versus series. In series, battery voltage adds. In parallel, charge (your amp hours) add. Previously I assumed your total charge is the sum of each individual battery charge.
Since we have two sets of batteries connected in series, and then in parallel, our equivalent battery is 24V, 70Ah. This makes sense because I think the Ryobi lawn mower is advertised at 24V, 70Ah too. It’s the same battery set up, apparently.
If we were to run all three deck mowers with a load of 3ft-lbf torque on them, it would take (70Ah)/(197A) = 21 minutes to completely drain our batteries (again, assuming that’s even possible to do, in reality it isn’t).
At half this torque value, total current consumption would be 28A for each deck motor, resulting in 113A total. That results in (70Ah)/(113A) = 37 minutes of run time. The E30-400 motor consumes 29A of current at peak efficiency, so I’m hoping that I’ve sized these motors for the sweet spot of their performance.
If you were to bump up the battery size used on the mower to four 50Ah batteries, run time would be (100Ah)/(113A) = 53 minutes. Doing this would add 34lb to the mower, which would show up in the current consumed by the drive motors.
Thoughts
Even though I have more confidence in these numbers being correct, they’re still disappointing. I would like to shoot for a minimum 2 hours of run time. The only two ways I can think of to get there:
More efficient motors and electronics.
Larger batteries.
Using BLDC motors would increase our efficiency, but they cost 4 times the brushed DC motors I intend to use. Reduced run time is an acceptable trade off to save $700 in my opinion.
Larger SLA batteries start getting pretty ridiculous beyond the four 35Ah’s I’m using currently. The battery bay has to grow to accommodate the larger batteries, and that pushes the wheels out, increasing the wheel base and negatively affecting vehicle performance.
Additionally, the added weight makes me wonder if the 0.125in sheet metal battery bays are sufficient to support the weight of the batteries. Two 50Ah SLA batteries weigh 64lb. I’d probably want to reinforce it just to make sure.
We could switch to some Lithium Ion batteries, but here the cost is at least as bad as switching to BLDC motors.
A brief cost and performance comparison of a composite lithium ion battery versus our current 12V, 35Ah SLA battery.
If you were to make a composite battery out of 18650 cells equivalent to the four 35Ah SLAs I’m using currently, it would cost just shy of $1,000 in 18650 cells alone. And that doesn’t even include labor to build the battery and a fancy charging system to go with it.
I found some guys that make custom 18650 batteries, and maybe they can do it for cheaper. I’m starting to understand why Tesla’s use lithium ion technology. If you need a boat load of power and have any kind of space or weight constraint, you kind of have to. Unfortunately, I drive a 2003 Honda Accord, not a Tesla Model X and so the mower project can’t afford some legit lithium ions.
I may have to get used to about 30 minutes of run time.
I decided to make the autonomous lawn mower fully electric for one big reason: If a person has to walk out to the mower with a gas can and refill the tank, is it really autonomous?
Ideally, you want the mower to do it’s job without any human intervention. If you have a gas engine, no matter how you cut it fuel has to be delivered to the mower in some fashion. With an electric design, you can have the mower automatically dock with a charging station when the battery gets low. No human required.
So from the get-go I have been trying hard to make the mower electric. I am encouraged by some electric riding mowers out there that use SLA batteries as their power supply. I like SLA batteries because they contain a lot of energy and are fairly cheap. Minimizing battery weight and volume isn’t a huge constraint for this project, thankfully.
Because these electric riding mowers cut grass and carry a ~200lb person on the mower, I have been operating under the assumption that as long as our batteries are larger capacity than those on this riding mower, we should be okay. That Ryobi mower features a battery bank that consists of four 12V, 25Ah SLA batteries.
I am beginning to question that assumption…
Power Consumption
Sizing the batteries ultimately depends on how much power the mower needs. The deck motors take the lion’s share of power consumption. Previously I estimated the mower would require motors that can output at least 5ft-lbf of torque to cut through thick grass based on typical gas engine torque output.
Examining the torque curves for the E30-400 motor I selected for our design shows that at 5ft-lbf or 3.7N-m torque, the motor consumes 1400W of power. If you assume all three motors pull this level of power, the deck motors collectively consume 4200W.
The drive I’m using on the mower design are stolen from the wheel chair. I suspect they are rated for 500W but I am not sure. The gearbox on them ensures they will generally be operating in an efficient area of their torque curves, so I am going to consume both motors consume 250W, and collectively consume 500W between the two motors.
The control electronics are almost negligible compared to the power consumed by the motors, but I will budget 100W for all the other little things on the mower, just to be safe.
That brings the total estimated power the mower needs during operation to 4200W + 500W + 100W = 4800W.
Battery Capacity
The batteries I’ve selected are four 12V, 35Ah SLA batteries. If you assume we intend to discharge these batteries 100% (and that doing so was physically possible), you could obtain (4)(12V)(35Ah) = 1680Wh of energy. If we were to draw 4800W of energy from these batteries, we would drain them in (1680Wh)/(4800W) = 21 minutes. Yikes.
But it gets worse. Because we’re pulling so much power out of these batteries, it looks like you have to discount the total amount of energy you can get out of them. I’m not entirely sure what that calculation looks like, but from the SP12-35 datasheet, it looks like a 1hr discharge rate only allows you to get 21.8Ah of charge out of each battery. That’s only 60% of the 20hr rate of 35Ah. I could be wrong about this interpretation of the datasheet, please correct me if I am mistaken.
Some Thoughts
Do the motors really draw that much power? Holy moly I hope not. At their most efficient, the motors draw 500W of power. Running the calculations above with this number gives you a run time of 48 minutes. Still not great.
The reality is somewhere between those two extremes. Taking the average of the two gives 35 minutes of run time. I was hoping for something more in the neighborhood of 2 or 3 hours. Going up to some 12V, 50Ah batteries could give us some extra oomph, but I don’t think it will be 3 hours of oomph.
Please let me know if these numbers seem way off base, it’s my best swag at them I can come up with. The last thing I want is a mower that can only cut grass for 10 minutes.
I’ve started doing some wiring diagrams for the robot lawn mower, as the mechanical portion is fairly well defined. However, there are a few things I’m still not sure about:
Will four 12V 35Ah SLA batteries will provide the energy needed to run the mower?
Should the battery bays be replaced with some off the shelf enclosures?
Is there a better way to do the deck height adjustment mechanism?
Are the motors sized appropriately, both for speed and torque?
Is a pulley quick disconnect bushing really the best way to attach the cutting blade to the motor shaft?
The sheet metal used on the weldments is 0.1875in thick aluminum. That is expensive and probably too stout. It should be changed to 0.125in thick.
I’m chasing my tail with these questions above, so I will take some time off from modeling the mechanical side of the mower and work on wiring for a while. Hopefully things will be more clear when I revisit these issues later.
A simple height adjustment mechanism for the mower deck.
I’m trying really hard not to turn the height adjustment mechanism into a science project. All it needs to do is (1) support the mower deck and (2) allow the height of the deck above the ground to be easily adjusted.
You can find some exciting mechanisms out there to adjust the height of a mower deck. Google Scag Tiger Cat Height Adjustment if you want to see one of the more interesting ones.
A lot of mowers have a mechanism that lets you adjust the mower deck with one single lever. While I like these mechanisms I don’t think they’re necessary for the robot mower. How often do you typically adjust your lawn mower’s height? I do it once a year, if that.
For this project, having to adjust the height in four places versus one is a small price to pay compared to the time it would take to both engineer a mechanism that would work for our robot mower. Not to mention the cost to make it. Springs and linkages get expensive quickly, and the risk it won’t work right goes up fast when you start adding lots of moving parts.
I like simple. I’m not that bright, so I figure if I can envision something working, chances are it will probably work okay in real life. To adjust the height of the deck, pull the quick release pin, rotate the lever to the appropriate height, and put the pin back in. Do that in four places and your done. Simple!
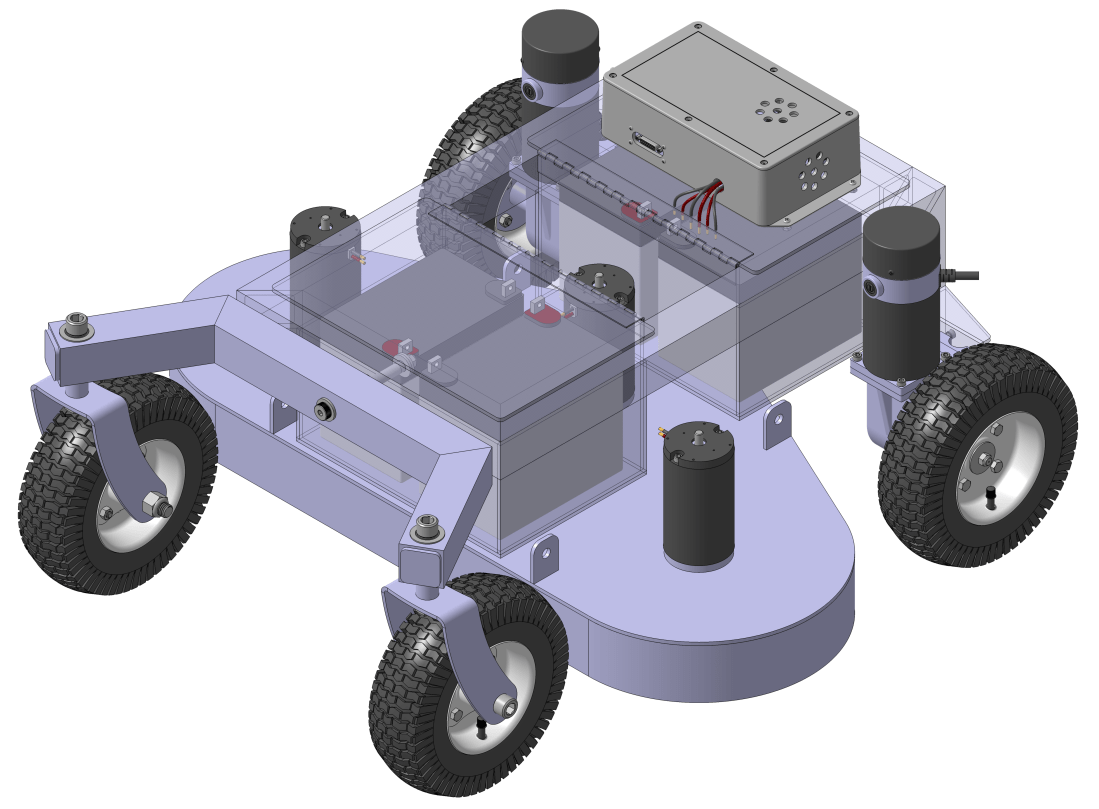
The autonomous lawn mower design is coming along nicely. It turns out that the batteries fit nicely below the robot frame. I only had to raise it by 1.5in to give adequate clearance for the battery terminals. This keeps the center of gravity low, and makes for an all around good looking robot in my opinion.
I have an RTK GPS module arriving in December (more on that later), and I want to get the lawn mower design as mature as I can before I need to start investing my time testing that module with the wheel chair.
My list of open items on the design as of this evening:
Latches for the battery compartments. Maybe I don’t need them, but it would be nice to have some way to hold the doors closed. Maybe just some screws would work.
Control enclosure location. It needs to be far enough away from the deck motors to avoid the flux storm. But mounted in such a way that it doesn’t adversely affect vehicle performance or look goofy.
Deck height adjustment mechanism. The robot needs to have a way to simply and quickly adjust the deck height as you would on a typical lawn mower.
Safety shutoff and control system for deck motors. I think these should be powered by a separate set of relays so they can be independently turned off from the rest of the rover. They will still be wired into the master safety shutoff switch.
RTK GPS antenna mount location. Wherever the control enclosure box gets placed, it will need to have enough real estate on it for the GPS antenna.
General wiring. All the motors, the enclosures, everything. This will take a lot of time but as we saw earlier was very much worth it.
Mower deck discharge chute. The mower needs a plastic chute where the grass clippings discharge. It’ll also need the hardware that attaches it to the deck.
The autonomous lawn mower versus our wheel chair robot.
The autonomous lawn mower measures 37.5in long X 36in wide X 17.5in tall currently. Not bad considering our grass cutting width is 35.5in!
The nice thing about CAD software is you can see how different ideas play out before you spend a fortune to discover they don’t work. The past month or so I’ve been drawing up robot mower designs with little luck. The model above is the only one I feel even moderately good about.
Most of the concepts I’ve put together so far feature a sheet metal chassis shaped around my batteries and motors. The upside with these previous designs is that it allows for the smallest vehicle footprint. The downside is that they involve a lot of welding and waterjet parts, and it’s difficult to come up with a simple mechanism to adjust the deck height because the motors mount directly to the chassis.
This new concept has the mower deck hanging beneath the robot frame. Separating the deck from the robot frame allows both to be simplified greatly. To adjust the deck height I plan on putting a few turnbuckles between the robot frame and the mower deck. An added bonus is that I can disassemble it and throw the robot in the trunk of my small Hyundai sedan for field testing.
One potential downside I anticipate with the design above is that it will be top heavy. The four batteries have to sit on top of the robot frame. We can box them in and secure the to the frame, but I’m not sure what the vehicle center of gravity will look. Guess we’ll have to do some more modeling to find out.
There are a lot of variables to play with as we design the prototype autonomous mower from scratch:
The deck dimensions and shape are entirely up to us.
We get to choose the number of blades.
The size of the blades.
How the blades are driven: direct drive, through a pulley, chain, or timing belt.
What standard lawn mower components we attempt to use.
This is not an exhaustive list, but these are the main variables I find myself tweaking as I try to optimize the design.
We have a lot of freedom to do whatever we want because we are custom making the mower deck. But this also creates a lot of questions. As we discussed previously, the deck geometry and the number of blades used on the mower lock down several of these variables. So before we go any further, I want to go into detail the advantages and disadvantages of a design with one, two, and three mower blades.
Single Blade Mower Design
Dimensions of the top of the single blade mower deck. Length is 37.5in, width will 31in for a 30in blade.
The single blade design has one huge advantage: one blade, one motor. The motor can even be coupled straight into the blade if it is sized appropriately. This could minimize cost and complexity in a big way for our design.
Unfortunately, it also creates some disadvantages that aren’t immediately obvious:
A single blade design results in the longest wheelbase, which will adversely affect the agility of the mower.
It also results in the largest mower deck. That means it will be heavy and expensive compared to alternatives.
The largest blade you can get is ~30in. So in addition to the negative performance and cost impact from the points above, you can only achieve a cutting width of ~30in with this design.
And on top of all these issues, you also have to go with a minimum 3kW BLDC motor and controller to get the power you need to rotate the blade. That’ll set you back close to $700 after everything is said and done.
Yikes. Turns out a single blade actually creates more problems than it solves. If our target cutting width was in the neighborhood of 20in, this would be the way to go. But since we’re aiming for closer to ~36in, this design is unacceptable.
Two Blade Mower Design
Dimensions of the top of the two blade mower deck. Length is 25.5in.
The two blade design solves a lot of the issues that the single blade design faces. The deck length and resulting wheelbase are considerably smaller, and because there are two blades that need to be driven, two smaller, cheaper motors could be used. Or alternatively, you could use one large motor and have a pulley drive system transmit power to each blade.
The biggest drawback with a two blade design is related to geometry. In the picture above there are two dashed circles showing the path the tip of each blade with follow as it rotates. See how they overlap? If we leave the design as shown in that picture, the blades will crash into each other during operation. If space them apart, the grass between them doesn’t get cut.
There are two possible solutions to this issue:
Use a chain or timing belt to link the two blade spindles together. This will ensure they are synchronized through their rotation paths and won’t crash.
Separate the blades so their paths don’t intersect, but angle the deck. As the mower travels, it won’t leave a small tract of uncut grass.
Using chain isn’t a good option to synchronize the rotation of the two blades in my opinion. The blade drive system needs to be designed for shock loading, and also to minimize vibration for the Pixhawk. Chain doesn’t help any in this realm. It also creates maintenance issues, although those are secondary concerns. I suspect this is why V belt is used on commercial mowers most commonly, not chain.
A timing belt is a better solution, but this forces us to find a way to integrate timing belt sprockets into our design, which will invariably result in some expensive fabricated adapters to link an off the shelf timing belt sprocket to the mower spindle. So it’s a better solution than chain, but has it’s own set of problems. So option 1 is out.
Option 2 is an elegant solution, and you see it on commercial mower decks that feature two blades quite often. However, the tradeoff is that you increase the length of the deck because you are essentially moving one blade further forward than the other. See the picture below to see what I’m getting at.
The two blade mower deck, angled to where the blade paths overlap as the mower travels straight ahead.
Dimensionally, option 2 results in the same wheelbase as a single blade design, but with the headache of two motors. It may even be longer than a single blade design, because the swivel caster assembly on the front needs clearance to swivel.
Plus it just looks funky. So a two blade design is out, too.
Three Blade Mower Design
Initially I was hesitant to even consider a three blade design because of the number of parts it will require. Three blades, three spindles, three pulleys, a belt to connect all of the spindles, or three motors to direct drive the blades.
To complicate matters, the smaller the blade length, the faster it needs to rotate to achieve good grass cutting velocity. We previously discovered that a 21in blade requires 3500RPM in order to achieve a blade tip speed of 19000ft/min. For a 12in long blade, that number jumps to more than 6000RPM.
The relationship between blade tip speed and blade rotation speed. We’re aiming for a Vmax of 19000ft/min, or just below that.
This is a problem because most DC motors don’t operate at those speeds with any significant amount of torque. In fact, most of the motors I’ve seen have no-load speeds listed far below 6000RPM. That’s the bad news with a three blade design.
The good news? Other than these blade drive system constraints, the three blade design is geometrically very efficient. It results in the smallest wheelbase, and because it is triangular in shape, you get bonus clearance for the front casters to swivel. It requires the least amount of material to fabricate. That means cheap and lightweight.
The three blade mower deck design. It’s a very good combination of deck width and length.
The blades are separated by a small amount but because the center blade is slightly more forward than the outer two, you still get 100% cut coverage, similar to the angled two blade design.
The three blade mower design is by far the most efficient, and I like the way it looks, too. The only hurdle to making it works is finding a motor that won’t break the bank, but still get us close to the 6000RPM requirement for a 12in blade. If we can find a motor that works with this design it will by far be the best one of the three. Does such a motor exist?
The Holy Grail of DC Motors
We had previously considered BLDC motors to give us the power and efficiency we need to spin the cutting blade. But unfortunately that power and efficiency comes at a cost: BLDC motors require a controller to run them.
So even if you find a fairly cheap BLDC motor that meets your needs, tack on 50% of the motor price for the controller. Need three motors? Looks like you need three controllers, too. And the space to mount them somewhere. I’m sure they make combo controllers out there, but I can’t find them.
The other problem with these controllers is that you’re paying for a ton of features you don’t even need. Most are designed for electric scooters. I don’t need the ability to go in reverse, or to vary the speed. I just need a motor to spool up and stay there. With typical BLDC motor controllers, you get a bunch of these features, and boy do you pay for them.
So while BLDC motors fit our application requirements, they are costly. Ideally we’d like to use a simple brushed motor that operates at the speed and torque we need. Turn it on with a $3 relay. Keep it simple.
In my adventures across the interwebs, I had trouble finding anyone who makes a brushed motor that runs close to 6000RPM with significant amounts of torque, that also costs less than $400.
But that was before I found the folks out at AmpFlow. They make a really nice set of brushed, DC motors in the speed and torque range we need. They also appear to be US based, which is a plus. They post torque values in oz-in and dimensions in inches. And they have torque curves for their products. All around, these guys are awesome.
Next time I’ll go over the specifications for the E30-400 DC motor, which I think is perfect for this application.